Tuesday, June 23, 2009

Inspired by a Reproduction

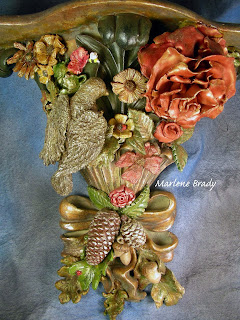
I saw the below wall bracket in a catalog and I fell in love with it. I wanted it so badly, but couldn't afford it. I was so inspired by the colors & textures I thought I would attempt to make my own version. I went to Hobby Lobby and bought a damaged wall bracket for $10. It was plain other than the bow at the bottom and the three scrolls at the top. Perfect size and the damage didn't matter because they would be covered. So, voila, below is my version.
 All the flowers, leaves, ladybug, bee, pine cones, acorns and bird are polymer clay. I hand sculpted the bird, roses, ladybug and bee. I had molds for the pine cones, acorn, leaves and smaller flowers. I shaped them by hand after adding a few veins, texturing or fingerprints. I baked them and hot glued them on to the bracket. I reinforced different areas under my polymer pieces with tissue and wood glue.  I also used Apoxie Sculpt to attach the larger pieces.
I added bronzing powders, acrylic and iridescent paints to highlight areas on the acorns, flowers, leaves and bird.

Monday, June 22, 2009

Polymer Clay Bracelets

Above is a memory wire bracelet.  Below is a bangle. I purchased the Teflon coated blank bangle on the Internet and covered it with scrap canes.
The below bracelet was one of those fake rhinestone bling pieces that were popular a few years ago. I left the large plastic rhinestones as they were and just covered them with cane scraps. No problems with baking it either. The elastic and plastic weren't compromised and the polymer adhered without a hitch.
So, try it. Whip up some canes and embellish!

Saturday, June 20, 2009

Brady's Finger Painting With Polymer Clay Technique

I know, you're asking yourself, "Finger painting with polymer clay? What?" But it is. Had this vase that I loved and in the process of moving to Arizona, it cracked. It didn't just crack a little, it cracked from the top to the bottom. I warmed up some green, copper and gold. Took a smidge of green and smashed it on there. The warmth from my fingers allowed it to thin as I applied pressure and it became easy to build layers. Took some copper and applied it over the green, pulling the ends out to resemble a cactus.
Added some gold here and there and that was it for the outside. The crack was covered and I was happy with the design. I did the same on the inside where the crack was apparent, finger painting a cactus design. I have a large convection oven just for curing polymer clay so the vase fit perfectly on its side. So far so good; the polymer has not chipped, cracked or peeled in six years.

Friday, June 19, 2009

Alter Ego Sculpture

 
 I took a Maureen Carlson weekend sculpting workshop. We were supposed to make our alter ego in art or a reasonable facsimile. We laughed so much and had such a good time, no one wanted to go home.  Pants, shirt and shoes are from polymer clay canes I made previously.

Her hair is from the fishing department at Bass Pro Shop in the lure section.   The concept was that an idea percolates, takes shape and blooms.

Thursday, June 18, 2009

Polymer Clay BIG Cane

The center of the teapot is the end slice of the 4" cane. The other end of the 4"cane is on the other side of the teapot. I just couldn't scrap them and couldn't think of anything else to do with them. There are various sizes of the cane on the rest of the teapot. The handle and spout are embellished with Swarovski crystals.
Below are two pin designs using the same cane and crystals.
Below is the first slice off of the final reduction of the 4" cane.
Another view of one of the pins.
Another view of the cross pin.
I love the color periwinkle; it's my favorite.

Wednesday, June 17, 2009

Small Sculptures

I have found so many people online and off who love little figures with stories put to them. So, what is it all about (besides me, of course)? Creating! I gave it a try and it was a lot of fun. I'm not good at writing or telling stories, etc., but the pieces fell into place enough that they sold. It is one of the greatest feelings to have someone fall in love with one of your pieces and tell you that they "just have to have it."
This one is a little imp who has hidden your other boot and is thoroughly enjoying watching you spin out of control because you can't find it. They are sculpted from polymer clay, over a wire and foil armature, have acrylic eyes and have either polymer clay or air dry clay for wings and accessories. The boot was purchased.

Tuesday, June 16, 2009

Gun Case = Portable Art

In 2000 I took a weekend workshop in downtown Chicago at The Whole Bead Show where Elizabeth Knodle was teaching. I took her Jewelry Design and Construction and her fabulous Free Form Peyote class and one more that I can't remember the name of.  She showed us how to travel light with our beading by converting a gun case into a beading case.  I adapted the same concept to my painting and converted a second gun case to a watercolor field box.


Below is my bead case. I keep a crimper, knot picker, small scissors, tweezers, thread, needles and a bead scooper on the left side under the foam insert. I cut a bead mat to fit the shape of the left side sponge.

Above and below is Jean Campbells' button kit I have been working on and putting my own twist on.

Beads are kept in pill holders purchased at Walgreens for $.99 each. The gun cases work out great.

Tuesday, June 2, 2009

Beaded Crochet, Trees & Wreath

Bead crochet. Crocheted ropes. Crocheted lariats. Whatever you want to call them, they are addictive. It took me a long time and three different teachers before this technique clicked. Once it did, I made 18 lariats non-stop. The lariats are longer than the ropes so you can wear them tied differently. Or as one teeny tiny customer said, "oh look, it makes a great belt!" The black and white series were challenging because if you are off by one bead, the whole pattern is off.
This one is called "Little Chicken Legs."

I donated this one to the Sun City West Beaders Club for their raffle.
A closer view of the flower and leaf fringe.
A variegated lariat with lots of lush loops so it drapes beautifully. I definitely need a new camera.

Yup, I individually glued each bead. If it didn't quite fit, I filed it down to fit perfectly. The trees and beaded wreath were donations to the Sun City West Beaders silent auction. And yes, darn proud they all sold.
I individually glued vintage beads on a styrofoam wreath and tied a big red bow.
The two trees on the left are made from broken chains, the one on the right is all thread with pearls glued on.

Paintings

The first two paintings below were an experiment with the liquid polymer clay over fabric. They turned out great and both were sold, so I will be doing more of these. It is really a messy product to work and a little time consuming, but worth it. The underlay of these paintings is a drizzling of regular gel medium, then handmade papers, then acrylic glazes. After the fabric was on, it was finished with more drizzles of the liquid polymer. After it was dry, the cloth was painted with a metallic acrylic paint and sealed with with a spray matte varnish.
Every once in a while I try my hand at impressionistic landscapes and abstracts. I look through my files, books, magazines and attempt to duplicate part of a composition or color combination, always falling short (gee, I wonder why....because they have degrees, worked hard and had years of study under famous artists and I had no art training??). But isn't it all about creating??

I love this little 8 x 10 painting below. I'm not sure why I love it so much, but I do. Maybe because I love the color periwinkle (the word too). Maybe because it gives me a sense of calm and peace. I like paintings where I have to "fill in the blanks". It forces me to get involved and connect.


The painting below has an underpainting of gold leaf, tissue papers & gel mediums. Acrylic glazes were added next and then sealed with a matte varnish (UV protection, of course).
The painting below (2 photos) is the result of an accident. I was arranging my finished paintings on the floor to get an idea of how I was going to hang them in my booth for the art show. My left wrist kept getting weaker and as I picked up a painting with my left hand, it fell out of my grasp, fell to the floor, puncturing two other paintings. Completely ripped through the canvases as it bounced from one to the other. And, of course, the one that fell couldn't give me a break and stay untouched. The stretchers were cracked. Anyway, to make a short story even longer, I cut up the canvases and have used the pieces in different collages. As long as the canvas pieces are sealed well with a good gel medium, they are fine. I was so tickled when the lady who purchased it said she really like the layering of canvases. Serendipity at its best.