Saturday, October 31, 2009

A Tiny Bit of of Polymer Clay

Hope your Halloween celebrations are safe and fun.
The centerpiece is an extra large glass dome on a cake stand. I stuffed the rubber mask with tissue and placed a cluster of plastic grapes on both sides of the monster's head.
I have also used a Glow Stick inside the mask making it eerier than it already is, but was too lazy this year.
Below is a cheap wooden soap dish from IKEA that I filled the 5 drain holes with polymer clay faux turquoise.
I carved and "X" in the middle and filled that with polymer clay faux coral.
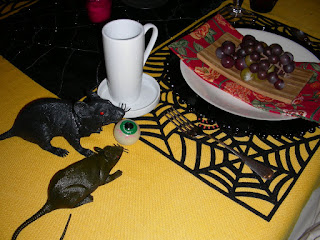
The soap dish had just the right amount of curve to it to lay right on the plate and hold the eyeball and grapes; an important consideration you know.
Of course, I think it still needs more polymer somewhere and sadly, I think it will be fingers for next year.

Thursday, October 29, 2009

Beaded Hatband

A simple, narrow hatband in peyote stitch with a couple of beaded feathers and a couple of charms.
Love it.

Wednesday, October 28, 2009

Chain Mail & Lost Wax Silver

I had a great time beading in New Mexico! Will post some pictures tomorrow, but wanted to say hello and how much I've missed this. I am so tickled to see 16 countries have been on this blog. I had to look up Latvia because I had no idea where it was. It's a republic in N Europe on the Baltic. So hello to all the bloggers in the US, Canada, France, UK, South Africa, Australia, Israel, Argentina, Latvia, Thailand, Romania, Malaysia, Japan, Portugal, Spain and Italy.
I made these chain mail bracelets with various gauges of sterling silver wire which determine the size of the jump rings, which determine the thickness and weight of the bracelet. It was so much fun to make my own jump rings from sterling silver wire and connect them by using an ancient chain mail pattern. The instructor taught this chain mail pattern by giving each set of jump rings a name (i.e., couple A, couple B, etc.) and then explained the dance they were doing. Shocked and happy I "got" it the first time around. Funny how we understand things when they are explained in ways we can relate to.
The above ring was a simple wax drip with a dark patina background. With my second ring below, I tried to get fancy by attempting to sculpt a tiny horse. Looks ok in some parts and not so ok in others, so I say it is an abstract of wild mustangs.
And that's about it for today.
Just wanted to say thanks to everyone for checking out "It's All About Creating".

Wednesday, October 21, 2009

My Lampwork Necklace

Before moving to Arizona from Chicago, I took two weekend lampworking workshops from a master teacher. When I arrived, the instructor was wearing a necklace comprised of sample beads (all in black and white) made by her displaying her various lampworking techniques. It was gorgeous! I want to do that, I want a lampworked necklace. I put my best effort into it. I really thought I could conquer it, which is why I invested in a second two-day workshop. "How hard can this be?", I thought. Also, I should interject that I have a slight fire phobia that I thought this class would help me overcome in a positive way.
I treasure this little necklace. Proud as punch I survived the workshops with very minor burns on both hands. I made the focal bead and the rest of the glass beads in this beauty. The normal beginner would have tossed these lame attempts, but, not me. I wear them proudly.
Then I had a momentary loss of sanity and ordered the best digital oven and stocked up on glass and all the paraphernalia because "a craftsman is only as good as his tools". What the heck was I thinking?
Now I was stuck with all this stuff (thank God I was able to sell it in Arizona), but thankful I didn't have to re-mortgage the house to pay for those two fun fire-filled weekends.
By the end of it all, I looked at the instructor and said, "Would you consider selling the necklace you are wearing?" Seriously. I knew I would never come close and it was so breathtaking. She said she would make a duplicate for me and I had it by the holidays. I will post a picture of it when I get back. And, yes, still have the fire phobia. I will be off to New Mexico re-energizing my “beading” heart (sorry, couldn't help it) with 15 or so other beading artists from across the United States for seven glorious days. The hubby is so happy. So, create, be happy and I will see you in a week. -Marlene

Tuesday, October 20, 2009

Polymer Clay Sculpture

I started with sculpting the aluminum foil armature and making sure I had the "hanging" holes placed far enough in. I reinforced the hole area with wire that was hooked on the ends so it would not come out of the polymer clay after it was cured. Then I applied the polymer clay in layers; baking each layer. I added liquid polymer clay each time I added another layer and baked. I always made sure to leave my wall hanging holes open. I finger painted the darker brown polymer clay to add emphasis and definition. I used Kemper tool punches (the small squares and small circles) to add the texture to his skin and add interest. I glued a soft piece of suede in the hanging holes to reduce the tension of the wire hanger. Placed the wire through the hanging holes and twisted a hanging loop in the middle; filing any sharp edges.
I had the horns and fur in my stash of "things I'll use someday" and epoxied them on. I had bought the rabbit skin at a western pioneer show and sewed it into the shape I wanted.
Epoxied the fur onto his head, signed it and sold it at our local Sun City West art fair.
I love learning from friends, classes, workshops, books, DVD's, tapes, TV and Internet, etc., but I have always struggled with "how can I put my own spin on this?" The following quote put it in perspective for me and maybe it will help you too.
Jim Jarmusch - “Nothing is original. Steal from anywhere that resonates with inspiration or fuels your imagination. Devour old films, new films, music, books, paintings, photographs, poems, dreams, random conversations, architecture, bridges, street signs, trees, clouds, bodies of water, light and shadows. Select only things to steal from that speak directly to your soul. If you do this, your work (and theft) will be authentic. Authenticity is invaluable; originality is non-existent. And don’t bother concealing your thievery - celebrate it if you feel like it. In any case, always remember what Jean-Luc Godard said: “It’s not where you take things from - it’s where you take them to.”

Monday, October 19, 2009

Sculptural Peyote Treasure Bracelet

Isn't this a busy little thing? My favorite bracelet of all time. Made it years ago. It is beadwoven in Sculptural Peyote stitch; full of gemstones, crystals, vintage beads, flowers, leaves and do-dads. More is more and less is a bore in this case.


Sunday, October 18, 2009

A Sketch Diary

I have sketch books, binders and files full of sketches. Inspiration is everywhere. I used to people watch and sketch them. I basically sketch out some form of something for a piece I may want to do later. The above and below photo is of a pencil drawing I did and love, but it is sitting in a closet because I just can't find a good spot for it and yet, I can't sell it.
I took a pottery class here in Sun City West, AZ and below are some sketches I did while sitting in the class (not paying attention). The clay pottery was fun, but polymer clay is where I belong.
I attended one of Cynthia Toops' (a polymer clay artist specializing in micro-mosaics) lectures/exhibit where she shared her sketch books and a display case full of its results. It was amazing and I was so inspired by her.
Her art education and travels were beautifully documented in her sketches. It was wonderful to see how her sketches tied into work. So, little by little I began my own little tiny versions of sketch diaries and I've kept it up.
Above are some quick scribbles and below are a few of the more detailed sketches.
For a while, all I wanted to do was pen.
A couple of pencil sketches.
I used to take the train downtown to work (in Chicago) and sometimes I would sketch as I walked. The below photo is of a pencil drawing I did while walking to the train.
I just got done looking through that folder full of "walking sketches" and I'm sitting here giggling again. What a sight I must have been. Time for art was precious then. I used every minute I could get. Now....time is just plain precious; whether it is for art or just plain living. I am acutely aware of how precious it is. So I am off to create something while the hubby is sitting in his favorite chair enjoying football. If you've never tried a sketch journal, give a try. It is a liberating feeling because the creativity just flows. And the more you do it, the more creative you will become.

Saturday, October 17, 2009

Cross, Cabinet, Pendants, Copy Holder, Beads

Because I can't get a decent picture of the finished river rock necklace, I'm filling in with these. Kind of jumping around. Covered some scrap clay with some of my canes to make a cross.
Covered a small wooden cabinet with my black, white & turquoise canes.
Below is a copy stand. I was inspired by the one I saw in Jana Roberts Benzon's class. A huge glob of scrap clay covered with an old polymer clay cane. I have dropped this thing at least three times. The outside has cracked a little and looks a little worse for wear, but other than that, it works.
I take this thing to classes or workshops to hold the instructions or whatever handouts there are. Sculpted a small shelf/holder for the pen/pencil because there are always notes to be taken (which never get taken because I think I will remember). Poking a simple hole for the pen would have been easier, but I liked this look better.
Make sure to gently curve the area where your papers are going to go. It's a good way to use up scraps.
I sculpted this Easter necklace as a display for my table at one of the local art fairs, but ended up selling it to a woman who worked at the West Valley Art Museum.
It was my first attempt at "jade". I used scrap clay as the base bead and patiently covered each and every one with the various jade colors I had so laboriously mixed. Baked them, took the above picture and thought they looked too dull so took it apart and threw them in the tumbler. When I pulled them out, all the jade had sanded off and I had ugly scrap clay.
A little pendant of scrap clay covered with tiny canes. Glued the crystals in with liquid polymer clay. Yes, I know, the wrapped loop is a disgrace and needs to be re-done, but I can't get it out because I "hooked" it to the inside piece. Live and learn, right?

Friday, October 16, 2009

Polymer Clay River Rocks

Above is my interpretation of river rocks sculpted in polymer clay. Below was my inspiration; a photo taken during my stay in Calistoga, CA. I feel peaceful just thinking about it.
Below - mine are the bottom four sitting in front of the photo.
I drilled holes pre-baking, but there are about five I need to re-drill because my leather cording for the necklace won't go through.
I'm hoping to get it strung this afternoon, but, who knows.
In the middle of making these yesterday, for whatever reason, I started to re-organize one of my storage cabinets. Plastic containers and boxes all over my already crowded table (see below).
And, no, I didn't clear anything out of the way. That would have made too much sense. Instead I just peeled clay off the bottoms of my boxes before putting them back in the cabinet.
So, as you can see, I used anything and everything. Premo, Fimo, SculpeyIII, Kato, Prosculpt, Studio and, of course, good 'ol scrap clay. The only tool was the dental tool (below) I use for sculpting. I have been collecting dental tools for a long time. I bought an antique set in Ainsworth, Nebraska many years ago and that got me started. Doesn't take much.
I am going to add some polymer clay copper leaves as spacers on the necklace; just to stay consistent with the inspiration photo. I haven't made them yet, so we'll see how far I get today.